
This is a guest post by Joe Buttry and Kim Bagby, Steve and Mimi’s son and daughter-in-law. At Mimi’s invitation, they are sharing a “2 Roads Diverged” view of their on-going trip:
So you want to turn your Honda Element into a #hotelement? Well, you’ve come to the right place. Read on for a handy-dandy guide, complete with photos! This post will have a lot of details, so Kim (purple text) and Joe (green text) will be working on it together. No sense in boring everyone with the same post twice, and if anyone is insane enough to try this all of our research will be in one spot (you’re welcome, hippie). Should any of the following text be confusing, we’ve linked two video tours of our Element at the end of the post. Two things to note:
- All of this is merely suggestion, it’s what’s worked for us.
- This stuff is EXPENSIVE. We hit up a lot of sales (including a perfectly timed REI Garage Sale for a crazy cheap Thule) and did a ton of bargain shopping. We don’t suggest you pay full price for almost anything on the gear list.
With that said, let’s get started!
K: Step one! Know a bunch of dirty hippies. They love this shit and will be your most valuable resource. Don’t know any hippies? Start eating Non-GMO/organic, drinking kombucha, and using essential oils. Hit up a drum circle. You’ll be on your way in no time.
J: My step one was to figure out where I was going to build our #hotelement. I chose my garage. Step two was to remove all non-essential equipment from the space. I skipped this step and made a giant mess, which will be waiting for me when we get back home.
Phase 1: Research
K: OK for serious – I started this project with a ton of research. Well, as much research as I could get done on the clock while at work. Pintrest and Google image searches were helpful in narrowing down the type of build we wanted to do. YouTube tours were my holy grail. Here are a few great starting points:
https://www.youtube.com/watch?v=9SYfZhP9AWw
https://www.youtube.com/watch?v=3rVNvteLmlA
https://www.youtube.com/watch?v=H1j9HWEXQcA
There are also a few apps we’ve used that have helped:
Roadtrippers
KOA
Allstays
TripAdvisor
Find Me Gluten Free (sorry)
Google Maps (duh)
Instagram (so our families could tell we were still alive)
J: I drew inspiration from my favorite childhood vehicle, the A-Team van. I began my research with Netflix. Additional research indicated I am a tall person. This meant that the bed height had to be as low as possible to make it easier to get in and out.
Phase 1 Summary:
For our build, we made the following overall decisions:
- Full bed with driver and passenger seats flat to accommodate tall person. Back seats would be removed.
- Roof cargo would be necessary.
- Bed platform would have to be tall enough to fit all kitchen and guitar cargo underneath.
- Blackout windows, Reflectix, and mosquito netting all needed.
- We would have to buy like a ton of stuff…we don’t camp.
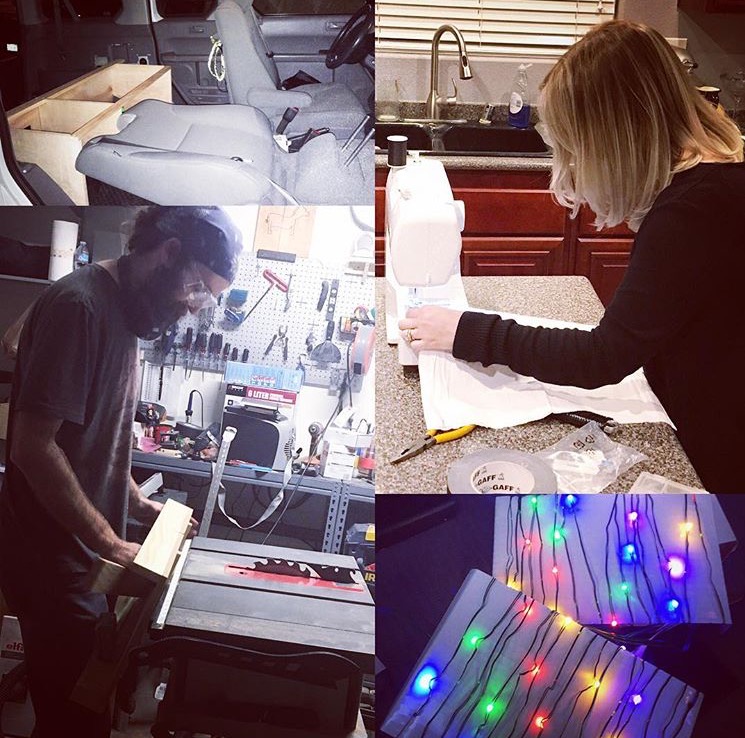
Phase 2 – Build
K: I highly recommend you marry a carpenter that owns both a table saw and a chop saw.
J: As a carpenter, when I design something like this I tend to start by looking at specific challenges I’ll face.
K: I’ve been told I think catastrophically, so this is me in my element (HA IN MY ELEMENT). What if we get a flat? What if we get into an accident? What about clothes for the memorials? HOW DO I CHARGE MY PHONE? We had a lot of topics to address.
J: Let’s start with the bed. It consists of two main components – understructure and bed platform. I used 3/4” ply for everything. Understructure started with a box running crosswise.
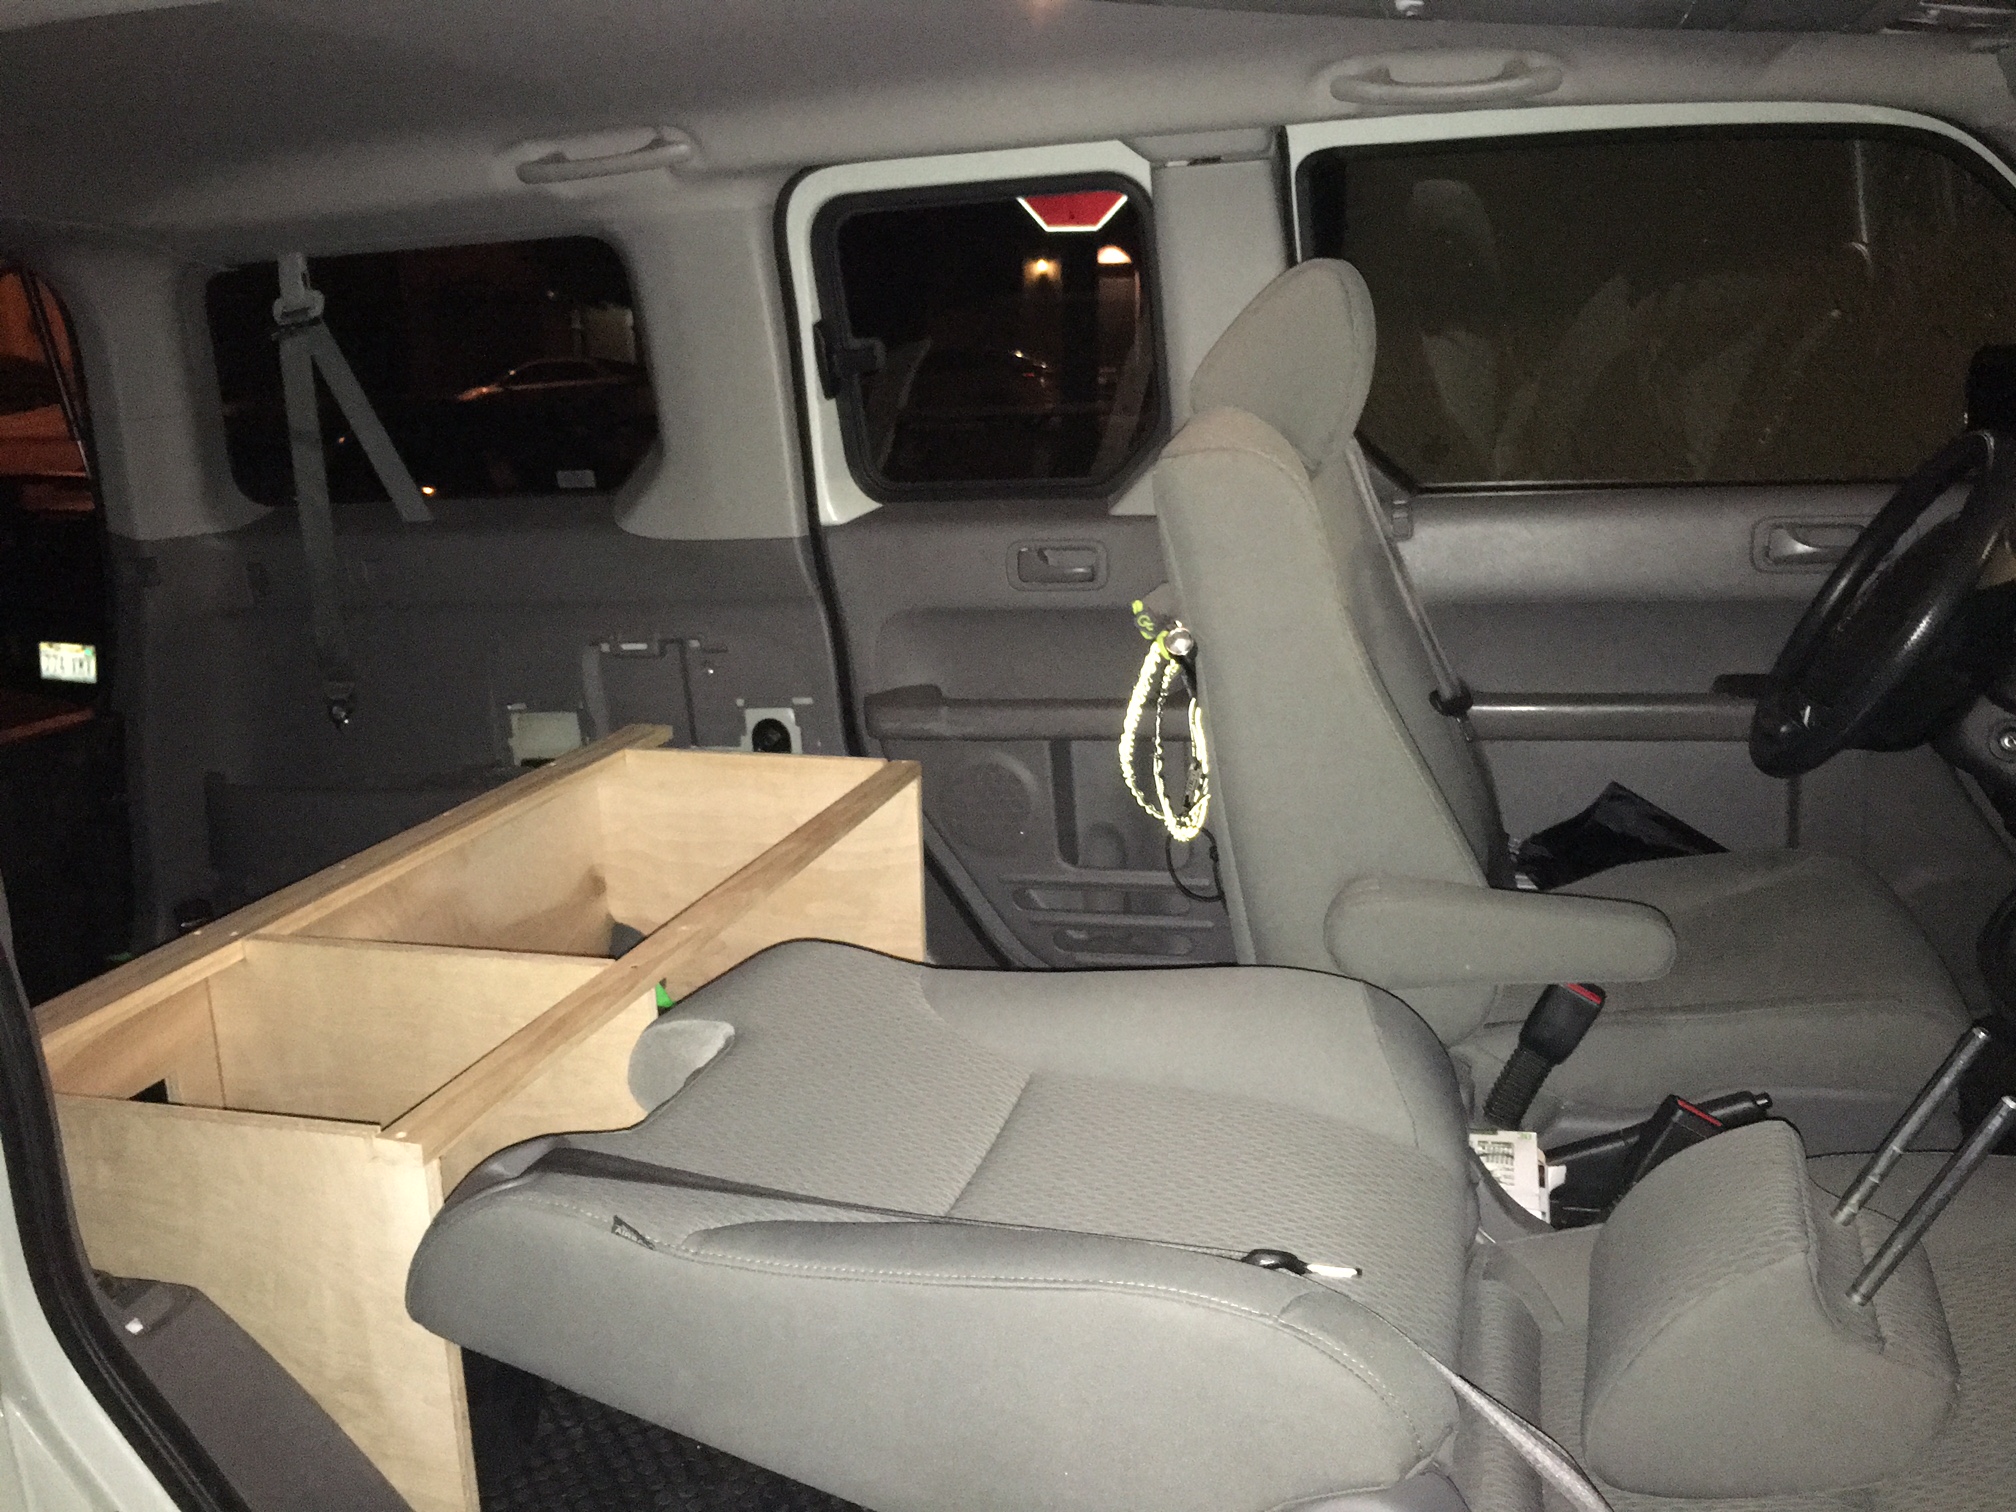
Understructure box – secured
This box is not flexible or hinged, it’s secured with ratchet straps to the backseat floor anchors. From this box, all other supports are hinged. This way we can easily access the spare tire. I based the storage compartment measurements off what we planned on storing (guitar, books, water jugs), but these compartments can be any size.

Bird’s eye view of the understructure layout – we might have forgotten to get a real photo of this one
K: Height of the bed platform was also determined by our storage underneath – specifically, the guitar and the stove. Our platform is 15” overall, with 14 ¼” clearance underneath.
J: The bed platform (top) has two pieces – one piece that is secured and unmovable (attached to the box) and a second piece that is hinged to both the other top piece (piano hinge) and the structure below (loose pin hinges). To secure the hinged portions and eliminate road noise, bungees attach the bed platform to the two rear tie-downs. I painted all of the structure and put cheap outdoor grill matting on the top of the platform to protect our mattress.
K: Structure built! High five! Extra points if you color match the bed structure paint to your car trim…which Joe did. I hear that Ikea has mattresses which exactly fit the width of an Element. We found that our futon mattress did as well, and saved money by using what we already had. Ikea was our Plan B.

Full size bed, cargo netting, battery operated lights. Neighbor’s car – he thinks we are crazy
J: We were left with empty space between the guitar and the bed platform. I installed two drawers for kitchen utensils and dishes to utilize the space.

Joe showing off his kitchen drawers
K: We tried to keep the rest of our kitchen supplies near the back of the car so cooking would be convenient. We ended up storing our clothes and packs towards the interior, with our food/cooler/stove/dog food to the rear.
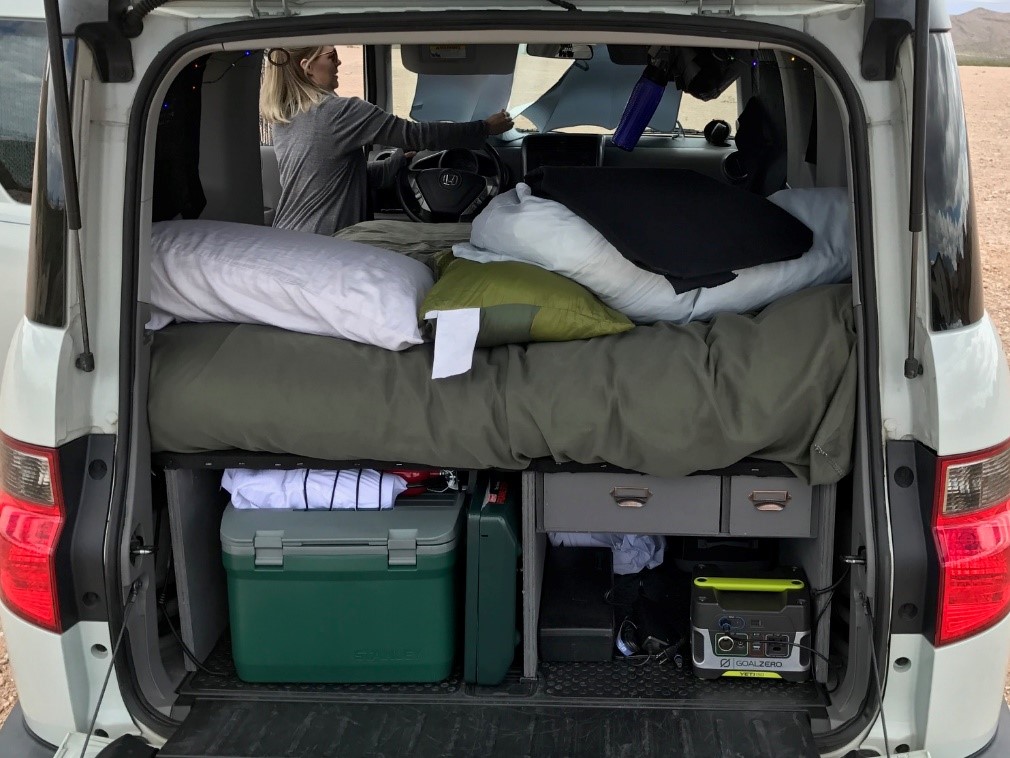
Kitchen layout – cooler, stove, drawers. power supply (in empty guitar storage area)
J: Let’s talk storage. Our biggest challenge was transporting our clothes for my dad’s memorials.
K: We discussed several options, and decided we couldn’t properly transport formal clothes without some type of rooftop cargo box. This space has proved invaluable. Initially purchased specifically for our suit/dress/shoes, it’s become home to our cold weather gear, extra dog food, and a catch all for rarely needed supplies (tool box, extra Reflectix, portable dog crate etc.).
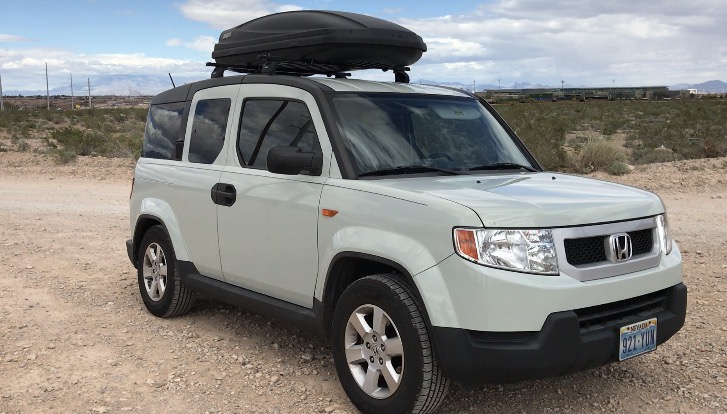
#hotelement with thule
One of our hippie van dwelling advisors (thank you, Karolina) suggested cargo netting for the interior of the Element as well. We purchased two bicycle cargo nets and used sash cord to rig them to the interior roof. The nets reach from the rear of the car to just behind the front seats. We’ve found this space to be most useful holding our bath towels, pajamas, and basically anything you’d need going to bed or waking up. Also great for keeping paper towels easily accessible.
J: I found the door storage pockets convenient for human and dog toiletries.
K: One of our biggest and continued challenges was/are the windows. We experimented with several options for blackout panels and mosquito netting. I’ll cut to the chase – Reflectix was by far the fastest and most effective way to block the windows. We started out with black duvetene around the Reflectix. It was fabulous – total blackout, basically no gaps. And then we slept in the car for the first time and realized how heavily duvetene is fire treated.
J: There was a smell issue. It was, for once, not dog-related.
K: I was able to sleep about two hours before it made me sick. The covers we had so lovingly sewn were torn up and thrown away not even halfway into our first night. Perfect blackout product, completely unusable. We haven’t worked on a better blackout solution yet.
Mosquito netting was one of the items we ran out of time for. We purchased several cheap dollar store mosquito nets and cut them to window size with about 2” of excess on all sides. When we want to sleep with the windows open, we throw the netting up with some magnets. Each net is stored in each door’s storage pocket. There are definitely better solutions for this, but we haven’t had time to find them.

Reflectix and mosquito netting – a horrifically ugly solution, but a solution nonetheless
J: Once we figured out how to blackout the car, we had to figure out how to light it.
K: I had two runs of battery operated LED wire string lights that I had purchased for my office at Christmas. I zip-tied the battery packs to the “oh shit handles” over the rear seats. The lights wound to the rear roof tie downs and back to the driver/passenger “oh shit handles.” BOOM! Done. It was enough light and we each had a string for our own side of the car. It was probably the fastest project undertaken on this build.
J: One of the YouTube video tours listed above discussed fans and power supplies, which turned out to be total necessities. We found a fan that could be powered by both battery and USB. One has worked for us, but two would have been better. We also purchased a GoalZero Yeti 150 power supply to charge our phones and laptop on days we don’t drive.
K: This power supply is awesome because you can charge it with 110V (normal outlet in your house), 12V (cigarette lighter), or add a solar panel. In theory, this is the perfect solution for our power needs. However, it’s brand new and doesn’t seem to be keeping a charge very well. Further investigation into this will happen when we get home…
Phase 2 Summary:
Make sure your bed structure is flexible enough you can access your spare tire, and secure enough that it won’t go anywhere in case of an accident. We based our entire build off our cargo needs. Various window coverings are a must. A power supply isn’t necessary, but sure is (should be) awesome.”
Phase 3: Gear List
Kitchen:
Stove – Coleman Classic Propane Stove (2 burner) http://www.coleman.com/classic-propane-stove/2000020943NP.html
Cooler – Stanley Adventure Cooler, 16Qt http://www.stanley-pmi.com/store/stanley/en_US/pd/ThemeID.39334800/productID.325306100
Water storage – WaterBrick 3.5 gallon (with spigot) http://www.waterbrick.org/product/waterbrick-standard-3-5-gallon-blue/
Dog food – OXO Good Grip POP Containers https://www.oxo.com/products/storage-organization/food/pop-container-big-square-4-0-qt-3-8-l
Various bins, dishes, cookware, and kitchen utensils – either previously owned or purchased to fit our drawer size
Bed:
Grill matting – Cheap from any hardware store http://www.homedepot.com/b/Outdoors-Outdoor-Cooking-Grill-Accessories-Grill-Mats-Pads/N-5yc1vZbxc2
Mattress – standard futon size with washable cover
Sleeping bags – evrgrn Crash Sack (Kim) https://www.rei.com/product/882939/evrgrn-crash-sack and Ozark Trail Deluxe XL Warm Weather (Joe) https://www.amazon.com/Ozark-Trail-Weather-Rectangular-Sleeping/dp/B00N375Y8A
Previously owned sheets, pillows, one heavy blanket
Storage:
Roof – Tuhle Force (Large), 50” square bars with 460 feet and 3109 fit kit https://www.thule.com/en-us/us/cargo-carrier/car-top-carrier/thule-force-l-_-1688652
Interior ceiling – Topeak bicycle cargo net (2) https://www.topeak.com/global/en/products/basket/324-cargo-net
Electronics:
Power supply – GoalZero Yeti 150 Power Station http://www.goalzero.com/p/164/goal-zero-yeti-150-solar-generator/
Fan – Honeywell Turbo On the Go Fan http://www.target.com/p/honeywell-turbo-on-the-go-black/-/A-16974338
Lighting – Cheap Walgreens battery operated LED strings
Windows:
Windshield – ACE Hardware Solar Shield reflective mylar sun shade http://www.acehardware.com/product/index.jsp?productId=1401283
All other windows – Combo of Reflectix and black fabric http://www.homedepot.com/p/Reflectix-16-in-x-25-ft-Double-Reflective-Insulation-with-Staple-Tab-ST16025/100012574
Windows capable of opening – dollar store mosquito netting
Safety:
Fire Extinguisher – First Alert Rechargeable http://www.firstalert.com/index.php?option=com_flexicontent&view=item&id=936
Carbon Monoxide detector – Kidde Battery Operated http://www.kidde.com/home-safety/en/us/products/fire-safety/co-alarms/kn-cob-lp2/
First Aid Kit – Sportsman Series Big Horn medical kit https://www.amazon.com/Adventure-Medical-Kits-Sportsman-Bighorn/dp/B008CZZV6I
Misc:
Chairs – Moon Lence Outdoor Ultralight Camp Chair (Joe) https://www.amazon.com/Moon-Lence-Ultralight-Portable-Backpacking/dp/B00Y2A6OAO/ref=cm_cr_arp_d_product_top?ie=UTF8 and Compaclite Oversize Folding Chair (Kim) http://www.acehardware.com/product/index.jsp?productId=121006756
Bath Towels – Gaiam Microfiber Yoga Towels http://www.target.com/p/gaiam-thirsty-yoga-mat-towel/-/A-51130084
Dog Crate – Nature’s Miracle 26” Port-A-Crate http://www.petsmart.com/dog/supplies-and-training/crates-gates-and-containment/crates/natures-miracleandtrade-port-a-crate-dog-crate-5163317.html
Tool Kit – made from our own tools, including screwgun, pliers, multi bit screwdriver, channel locks, electrician’s scissors, mat knife, super glue, assorted bed hardware, webbing, carabiners
Phase 3 Summary:
Buy whatever it is you think you need, these are just the items that worked for us. We feel that we’re using everything we have and that we are not missing anything major.
Our #hotelement video tours:
- Drive Mode https://youtu.be/2Ab8dbiUDHw
- Sleep Mode https://youtu.be/Cn4AprZUqzI
Thoughts
K: I did the majority of the research, but Joe did the majority of the building. He did an amazing job and will be accepting future offers for Honda Element conversion work. I’d recommend giving yourself more than 4-5 days to do a project of this size. We probably wouldn’t have needed the Thule if we didn’t have the guitar and formal clothes, so look for it on a Craigslist near you soon. A 45° sleeping bag is surprisingly warm (good to 28° so far) with one Yorkie added. Overall, the build was pretty fun – I got to exercise skills I haven’t used in 15 years (turns out, I do remember how to thread a bobbin). Our Element has been super comfortable, I’d call our build a success…just don’t ask me about going to my first REI Garage Sale.
J: This type of construction and problem solving plays to my strengths. I got that from both of my grandfathers. I took over the construction of any prefab furniture at the age of 12. My father had almost endless patience, but it was no match for cheap pressboard and allen wrenches. I have a great appreciation for the efficiency required for a trip like this to happen. There isn’t much room for clutter. Just about everything must have a place and it must be in that place. Now I just need to spread that into my garage…
process